
Getting the best stud finder for plaster walls might save considerable time and expense if there are repairs or routine household tasks planned. Hanging a shelf or a picture, making an outlet requires exact knowledge of the studs, beams, and wiring location. However, the stud finder tools vary in type, preciseness, and additional options (like an LED light or the wall-sticking design).
Plaster walls are usually quite thick, with dense structure. That’s why the magnetic stud finders aren’t that effective on them. The electronic models, though, provide better studs’ tracking, also enabling them to define their size. The reviews of stud finders for plaster walls show that they might possess a different number of sensors determining the precision of the tracking and the way to use the tool (the need for calibration).
Modern stud finders come in different sizes, shapes, and various ergonomic designs. They can also feature additional handy appliances like a visual screen or an LED light that picture the stud size, shape, and location. Some make the multifunctional tools having the level or a small drill integrated. Certainly, the cost varies as well.
Check the best stud finder for plaster walls of any kind and texture. Scroll down now!
Stud Finders for Plaster Walls Reviews
Franklin Sensors FS710PROProSensor 710+
This pro-grade tool combines high precision performance and simple design with two more tool options. It can efficiently track studs and metal, level and measure by means of an integrated ruler, bubble level, and sensitive stud scanner.
The unit tracks studs and metal using 13 sensors put in a row. Each sensor activates the respective LED light once it comes in front of the stud. The developed technology implemented in this stud finder allows it to determine the edge and center of the stud with high precision and speed.
To make it work, there is no need to undergo the calibration, look for stud- and wire-free area, turn the device on and off. The stud finder activates the sensors with the button pressure and sets to the search mode immediately. Multiple sensors let it calibrate the environment and discern the nail heads even in the thick plaster wall or drywall. With the ideal walls with even surface and consistency, the Franklin Sensors FS710PROProSensor 710+ is able to “catch the sight” of a stud at 1.6-inch depth. However, even with the curves and inconsistent filling of the real walls, it can work efficiently going down to 1.1 inches.
This stud finder doesn’t require a clean environment to work efficiently. It can be started near metal, wood, or other objects, which don’t affect its ability to track the studs.
The device is of a middle size and quite lightweight, weighing less than 10 ounces. It doesn’t feature a real handle offering the user to hold it at the battery compartment protrusion. By the way, the batteries are standard AA type, so there is no need to look for the recharging station or browse the stores for the rare 9V power banks. But for the limited indicating panel and ergonomics, this versatile high-quality tool could definitely answer the question “What is the best stud finder?”
Pros
- Shows all the studs in the covered area simultaneously.
- Covers a large area of 21 square inches at once.
- Accurate imaging of the stud width and center.
Cons
- Cumbersome battery replacement scheme.
- No wall-sticking appliance.
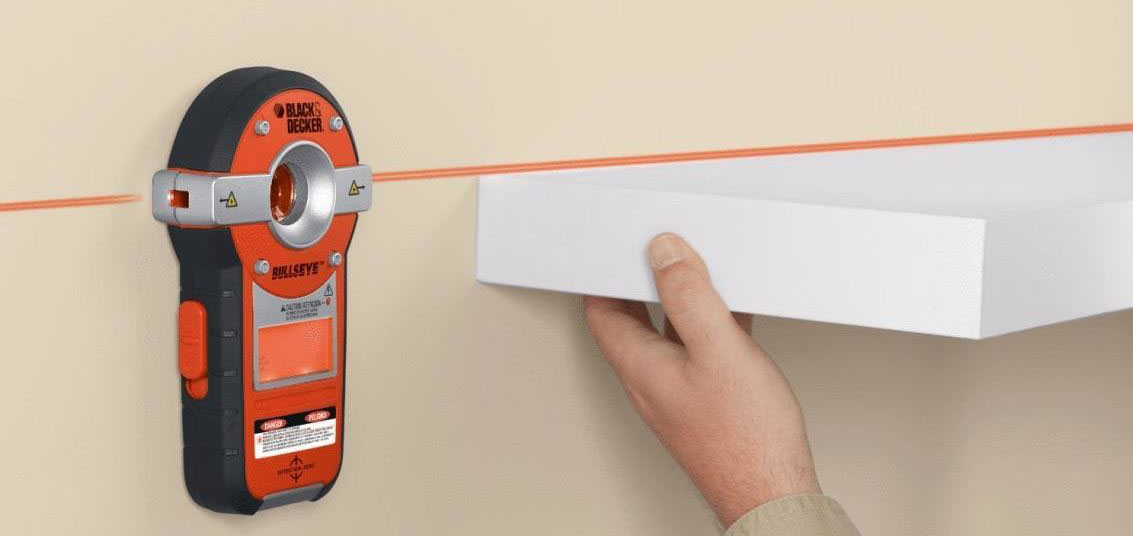
BLACK+DECKER BDL190S
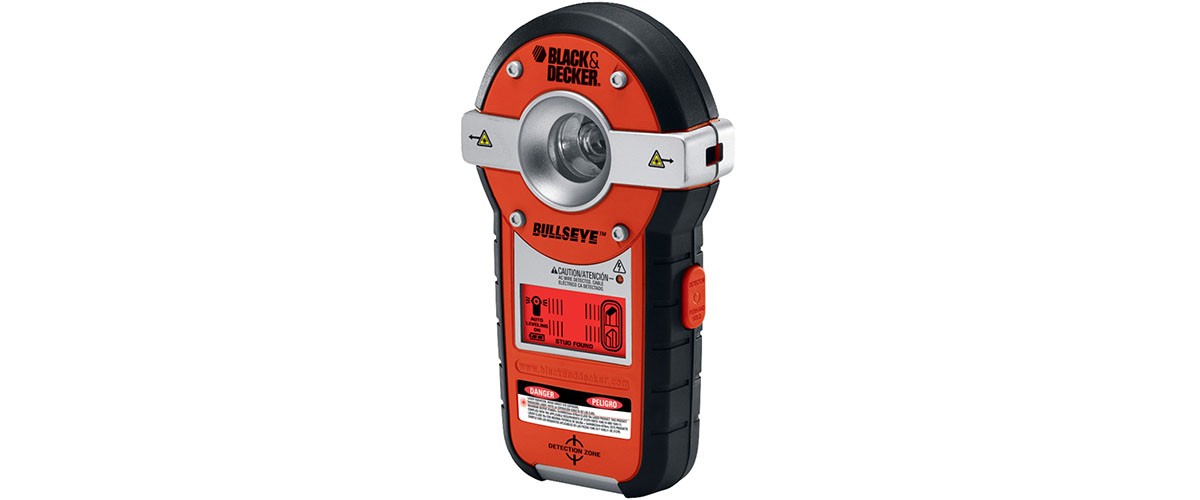
The multi-functional tool from BLACK+DECKER lets leveling the objects and tracking different kinds of studs in them. Based on the multiple sensors and penetrating the walls of a different kind, it makes a good stud finder for plaster walls. It is equally efficient for finding beams, studs, small nails, and screws. Due to the high sensitivity, it can track the AC cables in the walls (the working ones).
The tool works on the basis of the edge tracking technology and thus, it should be started in the stud-free area. The image of the stud is produced on the basis of the contour data received by sensors. The center is defined automatically and can be pinned down.
A handy feature is an LED screen reflecting the current status of stud detection and leveling. The screen informs on the readiness of the tool upon calibration, as well as of tracking a stud once it appears within the sensor’s reach. The latter varies for different wall materials and can be as much as ¾-inch deep, which is enough for most plaster walls. When the stud edge is tracked down, the relevant message appears on the screen.
But for the somewhat cumbersome calibration process, this tool could be praised as the best stud finder for plaster walls at cables’ tracking. It defines the AC wiring lying as deep as 1.5-inch inside the wall, and flashes the screen once the voltage is registered. The downside is that it tracks only live cables, with the voltage coming through.
The BLACK+DECKER BDL190S features a simple and comprehensive design and handy ergonomic handle. It isn’t lightweight, having 1.2 lbs. Still, the wall-sticking tack helps fix the stud finder without the need to hold it.
Pros
- The holder pin is easy to tack and remove.
- Soft coating of the handle, the tapered design enables the firm grip.
- Standard AA batteries applied let interchange them with other household devices.
Cons
- Inaccurate readings at the hand pressure.
- Might not track wide and large studs.
Zircon MetalliScanner m40
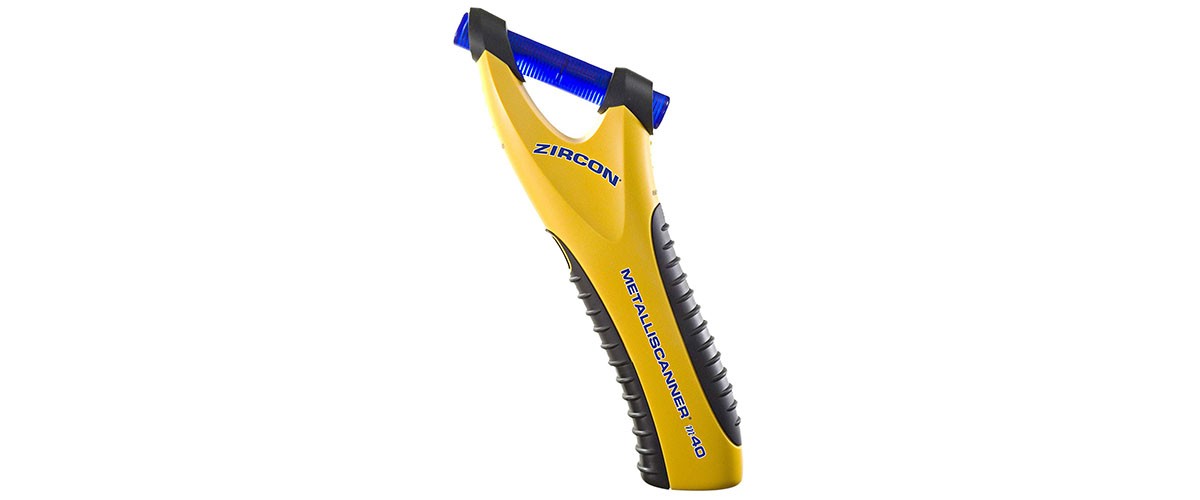
This compact plaster wall stud finder represents the affordable model of the Zircon electronic finders product line. While being less packed with the visualizing gear than other models, it provides the accurate tracking of the studs, metal, wiring, and piping. Applied on the plaster wall, it can efficiently locate the contour and the center of the stud, doubling its precision rating. Besides, it can also track metals, both ferrous and non-ferrous, with slightly less confident tracking for non-ferrous metals. The stud finder can locate them no deeper than 2 inches, while with ferrous metals, the sensors reach as far as 4 inches.
With this stud finder plaster, walls do not make an issue since there is no need to calculate the spacing and orientation of wooden beams. It checks the inside of the wall within seconds, signalizing a nail head or rebar immediately. It also works solidly on other surfaces like drywall or a stucco wall, and even the concrete walls and floors do not impede its scanner. While it’s not intended for AC wiring’ tracking, the metals contained in the wires can react to the stud finder sensors and warn the user.
The Zircon plaster stud finder is also praised for the Pin-Point technology implemented. It provides for the high accuracy of metal tracking enabling the device to locate the smallest screw or a nail head and establish its place exactly. To define the location of the studs, it “reads” the layout of nails and screws or rebar in the concrete wall.
The stud finder is compact, lightweight, and fits in the hand comfortably. It’s simple to use and can definitely be a top stud finder for lath and plaster walls if its efficiency for non-ferrous metals and metal-free studs would be higher.
Pros
- Wide Scan technology traces metal studs and pinpoint inclusions in solid materials like concrete.
- The blue LED indicator shows the signal strength determining how far the stud is.
- The long-lasting rechargeable battery.
Cons
- Small covering area.
- Frequent recalibration might lead to false positive signals.
Buyers Guide
How to Find Studs in Plaster Walls Using the Stud Finder
Intending to hang or fix something to the plaster wall, a carpenter or a DIYer would need to know the exact location of the studs. This might be not so crucial hanging a picture; yet, just driving the long nail or a screw into the plaster isn’t enough for a bookshelf or an LCD TV.
First of all, do plaster walls have studs? Yes, they do. The plaster is usually applied to the wooden construction with an equal distance between the beams (16 or 24 inches, for most houses).
Second, how to find a stud and not hit the electric cable or the piping system? There are several ways to do it. Knock on the wall trying to spot hollow places, study the electricity scheme to locate the base beam, or use magnets. Another way is to use the stud finder.
There are two types of stud finders: magnetic or electronic ones. With the former, all you need to do is to drag the stud finder slowly at the wall surface until it clings to the wall. Seems that the action is over? Not so fast. The magnet is attracted by metal, which can be the nail head in the stud or the water pipe. To ensure the thing behind the wall is a stud, you need to locate other parallel beams. When there are three of them traced at the same intervals, the mission is completed.
With the electronic stud finder, the scheme might vary. Many electronic scanners need to undergo calibration to track the wooden and metal studs. For that, hold the stud finder out of reach of metal and wood and turn it on (pressing the button or triggering the switch). Ensuring there are no false positive signals, proceed with the actual stud tracing. Place the stud finder against the wall. Make sure not to press it too hard, as some models might recognize the pressure as an obstacle and indicate the stud falsely. If such a problem appears, reset the stud finder.
Once on the wall or another surface, move the device slowly until it indicates the stud. To do that, some stud finders require constant pressing of the button. At this stage, it is important to know what kind of technology your stud finder implements — the edge or center one, or both. Having spotted a stud, move the stud scanner around to locate the stud’s contour. In order to fix the readings, use a pencil or a washable pen to mark the stud’s borders. Then, proceed to another stud that is potentially several inches to the right or to the left, and repeat the procedure.
Once having all the studs marked, ensure the distance is equal in each instance. A non-matching mark might mean there isn’t a stud behind the coating but piping, thick wires, or another wall component.
Owning a stud pattern, you are free to drill, nail, or perform other household tasks!